In this article I want to focus on and dive deep into the topic of navigation in Angular. As we know, navigation in Single Page Applications (SPAs) differs from the classic approach.
Traditionally, during navigation, applications send a request to the server and then they return an appropriate HTML template. This happens every time we change the URL in an application.
SPAs handle it differently. Web browsers receive only a single page – index.html. So, how do we solve the problem of navigation in such an application?
Luckily we don’t have to think too much about it. Angular provides an excellent solution for us. When a user is trying to change the URL, the client-side router takes control and updates what we see on the screen without unnecessary reload of the whole page.
Declarative approach – HTML templates
The RouterLink directive is a declarative approach to handle navigation. It allows us to use standard <a> tags within the Angular framework.
How to use routerLink?
Using this declarative method is simple: we replace classic href attribute with the routerLink directive and provide the appropriate path.
<!-- Classic approach —->
<a href="https://angular.love/roadmap">Roadmap</a>
In order to use this method, we must remember about importing RouterLink from the @angular/router package.
<!-- Declarative approach -->
import {RouterLink} from '@angular/router';
…
<a routerLink="roadmap">Roadmap</a>
It’s important to note that routerLink cannot be used for navigating to external URLs; it only works within the routing scope of our Angular application.
Advantages of the declarative directive
This directive offers several key benefits. One of the most fundamental is that it supports relative URLs. This helps us avoid static links that trigger full page reloads and cause applications to lose their state. Thanks to this approach, our app remains flexible and resilient to environment changes. The navigation logic will work correctly regardless of the application’s baseUrl configuration.
// absolute url
<a href="https://www.angular.love/roadmap">Roadmap</a>
// relative url
<a href="/roadmap">Roadmap</a>
There are two approaches to implement relative URLs in Angular, and both of them are perfectly valid.
 <a routerLink="roadmap">Roadmap</a>
 <a [routerLink]="['roadmap']">Roadmap</a>
Array as a parameter
The second approach uses an array to build dynamic parts of our URL. We can pass multiple segments as separate array elements, which can be either strings or numbers. The easiest way to understand this is by looking at an example.
<!--  If we assume the id variable is a string with the value “router-link” the resulting URL would be https://angular.love/roadmap/router-link –->
<a [routerLink]="['roadmap', id]">Roadmap</a>
Additionally we can choose whether our path should be relative to the current URL or absolute (starting from the root domain). As before, the best way to understand this is to take a look at examples.
<!-- We assume that user is currently at /settings and wants to visit /settings/notifications -->


<!-- Relative link -->
<a routerLink="notifications">
Notifications
</a>


<!-- Absolute link – works no matter of our localization in app -->
<a routerLink="/settings/notifications">
Notifications
</a>


<!-- RouterLink utilizing string -->
<a [routerLink]="'/settings' + '/notifications'">Notifications</a>


<!-- RouterLink utilizing an array -->
<a [routerLink]="['/settings', 'notifications']"> Notifications </a>


<!-- Static path -->
<a routerLink="/team/123/user/456">
User 456</a>


<!-- Dynamic path segments -->
<a [routerLink]="['/team', teamId, 'user', userId]">
Current User
</a>
Additional parameters – query params and fragments
Our links can also carry additional data in the form of query parameters and fragments.
Query parameters are typically used to manage application state without altering the route structure. Fragment – sometimes called an anchor is used for precise navigation to a specific element on a page (by ID) rather than just the routing path itself. Take a look at the examples bellow:
<!-- After navigating it will look like this: /notifications?debug=true&message=new -->
<a routerLink="notifications" [queryParams]="{ debug: true, message: 'new' }">Notifications</a>


<!-- After navigating it will look like this: /notifications#desktop -->
<a routerLink="notifications" fragment="desktop">Notifications</a>
Active links with dynamic classes – RouterLinkActive
In our applications, we frequently need to detect and dynamically style links that match the user’s current route. Angular provides us with a built-in solution for this task- RouterLinkActive directive. It’s necessary to import it from the @angular/router package.
Beyond simply toggling a class on our active link, we can easily take care of accessibility just by simply adding ariaCurrentWhenActive. This attribute notifies screen reader users of their current position in navigation by adding aria-current automatically. Below is a simple example straight from the official documentation.
<nav>
 <a
   class="button"
   routerLink="/about"
   routerLinkActive="active-button"
   ariaCurrentWhenActive="page"
 >
   About
 </a>
 |
 <a
   class="button"
   routerLink="/settings"
   routerLinkActive="active-button"
   ariaCurrentWhenActive="page"
 >
   Settings
 </a>
</nav>
/* The active link will have red text */
.active-button{
   color: red;
}
We are not limited to a single class. We can apply multiple classes to our link by using array in routerLinkActive directive.
<a routerLink="/user/bob" [routerLinkActive]="['class1', 'class2']">Bob</a>It’s important to note that, by default RouterLinkActive will be “active” even if the current URL is a child or a more deeply nested route.
To override this default behavior, we can use the routerLinkActiveOptions directive with a specific configuration object that enforces an exact match.
Without this option, a link pointing to /user will be active for every single subpage that starts with /user (e.g., /user/setting, /user/profile).
<!-- If we assume that user is currently at:
/user/jane/role/admin -->


<!-- Will be active -->
<a
 [routerLink]="['/user/jane']"
 routerLinkActive="active-link"
>
 User
</a>


<!-- Will be active -->
<a
 [routerLink]="['/user/jane/role/admin']"
 routerLinkActive="active-link"
>
 Role
</a>


<!-- Will not be active -->
<a
 [routerLink]="['/user']"
 routerLinkActive="active-link"
 [routerLinkActiveOptions]="{ exact: true }"
>
 User
</a>
The directive can be applied to a parent element, allowing us to flexibly apply styles in the correct place. Here is another example from official docs.
<div routerLinkActive="active-link" [routerLinkActiveOptions]="{exact: true}">
 <a routerLink="/user/jim">Jim</a>
 <a routerLink="/user/bob">Bob</a>
</div>
Programmatic Navigation
While the previous declarative approach handles navigation in HTML templates. What if we need to redirect users based on logic or specific state in our code? That is where Router comes in. It offers a wide range of methods to handle navigation behavior in our Typescript code.
import {Router} from '@angular/router';
@Component({
…
})
export class AppDashboard {
private router = inject(Router);
…
}
Navigate method
Injecting router makes it possible to navigate by using navigate method:
navigateToSettings(): void {
   this.router.navigate(['/settings']);
}
We can also pass various parameters to the router, such as route, query and matrix parameters:
navigateToCategory(category: string): void {
  // route parameters
  this.router.navigate(['/category', category]);
  // query parameters
  this.router.navigate(['/category'], {
    queryParams: { category: category, sort: 'quantity' },
  });
  // matrix parameters
  this.router.navigate(['/category', { category: category, sort: 'quantity' }]);
RelativeTo
We can use router.navigate() for both simple and more complex tasks, but it truly shines when building dynamic, relative paths using the relativeTo property. It allows us to navigate based on the current component’s position in the route tree. Once again, let’s look at example from documentation, as it is very clear and easy to understand:
import { Router, ActivatedRoute } from '@angular/router';
@Component({
 selector: 'app-user-detail',
 template: `
   <button (click)="navigateToEdit()">Edit User</button>
   <button (click)="navigateToParent()">Back to List</button>
 `,
})
export class UserDetail {
 private route = inject(ActivatedRoute);
 private router = inject(Router);
 // to parent
 navigateToEdit() {
   // from: /users/123
   // to:   /users/123/edit
   this.router.navigate(['edit'], { relativeTo: this.route });
 }
 // to parent
navigateToParent() {
   // from: /users/123
   // to:   /users
   this.router.navigate(['..'], { relativeTo: this.route });
 }
}
Navigating via a Full path
Injecting the Router also grants us access to the navigateByUrl() method. This method allows us to navigate to a specific destination using a complete URL string instead of an array. This is particularly useful when we already have a full URL at our disposal – for example, when handling deep links or when the navigation path is provided by an external source.
router.navigateByUrl('/search?category=books&sortBy=price');Controlling router behaviour
Angular gives us the opportunity to control how router behave during navigation through different paths of our application. This is handled via the NavigationBehaviorOptions interface. It’s a built-in set of tools to use with router.navigate() and router.navigateByUrl() methods. One of the most useful options that we will cover is onSameUrlNavigation. It defines what should happen when a user attempts to navigate to the URL they are already on. By default Angular does nothing but if we pass the ‘reload’ option it forces navigation to re-run the entire lifecycle. This means Guards and Resolvers will be executed again. It’s crucial to remember that this option doesn’t refresh the whole component (does not destroy and recreate it)!
// Default behavior: does nothing if we are already on the 'stocks' page
this.router.navigate(['stocks'], { onSameUrlNavigation: 'ignore' });
// Re-runs guards and resolvers for the 'stocks' page
this.router.navigate(['stocks'], { onSameUrlNavigation: 'reload' });
The second option in our toolkit is skipLocationChange, which accepts a boolean value. When set to true it will perform navigation but does not record it in the browser history. Furthermore, the URL in the address bar remains unchanged. This is particularly useful when we want to redirect a user to a new state but prevent them from returning to that specific path when they click the browser’s “Back” button.
this.router.navigate(['/stocks'], { skipLocationChange: true });
A related option that allows us to overwrite the current entry in browser’s history and address bar is replaceUrl. Much like the previous option, it accepts a boolean value. A common use case for replaceUrl is preventing a user from navigating back to the login page after they have successfully authenticated.
this.router.navigate(['/stocks'], { replaceUrl: true });
Dynamic classes – isActive
Another important thing to know from Angular Router is the isActive function. It returns a boolean value wrapped in a computed signal, which informs us whether a specific URL is currently active. A common use case of this signal is to dynamically apply classes in the HTML template. Much like in RouterLinkActive. Once again, take a look at an example from official docs:
import {Component, inject} from '@angular/core';
import {isActive, Router} from '@angular/router';
@Component({
 template: `
   <div [class.active]="isSettingsActive()">
     <h2>Settings</h2>
   </div>
 `,
})
export class Panel {
 private router = inject(Router);
 isSettingsActive = isActive('/settings', this.router, {
   paths: 'subset',
   queryParams: 'ignored',
   fragment: 'ignored',
   matrixParams: 'ignored',
 });
}
UrlTree
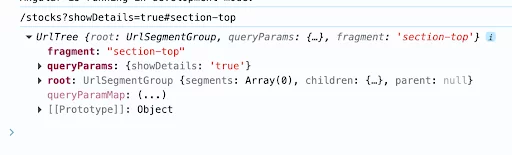
To round off the basics of navigation in our framework, we can’t forget about UrlTree. It’s one of the concepts that happens under the hood in Angular. While it might seem like a URL is just a flat string of characters, Angular actually parses it into a sophisticated tree structure composed of segments, parameters and children.
// /stocks?showDetails=true#section-top
const urlTree: UrlTree = this.router.parseUrl(this.router.url);
console.log(this.router.url);
console.log(urlTree);
This short snippet demonstrates how the URL is actually represented. You can see results of console logs in the screenshot below.
We can also generate our own URL structures with the createUrlTree method. Manually constructing complex URL strings is often error-prone; however createUrlTree mitigates this risk.
This method accepts an array and Angular automatically handles construction of the final URL string on its own.
// create /team/33/user/11
router.createUrlTree(['/team', 33, 'user', 11]);
// create /team/33;expand=true/user/11
router.createUrlTree(['/team', 33, {expand: true}, 'user', 11]);
In addition to string and arrays of segments, RouterLink might also accept a UrlTree object. This functionality is extremely useful, when we want to separate URL construction logic from the HTML template and move it into the component class.
<a [routerLink]="targetUrlTree">
 Url Tree
</a>
Summary
Navigation is the key element of every project. A deep understanding of the routing concepts used in our framework is essential for building robust, functional and maintainable applications.
In this article we explored various ways to handle navigation and examined powerful functions used both in HTML templates and Typescript code. I hope you’ve learned something new today and that your future projects will benefit from these navigation practices.